Of the many things a CylinDraw can do, engraving tumblers excites me the most because it is the most disruptive when compared to existing tech.
Our product is so new most people aren’t yet aware of the value our tool brings to this industry, so this article will directly compare the capabilities of a CylinDraw against a laser engraver.
If you shop online (on say, Etsy) for a custom engraved tumbler there is a 100% chance the seller is making them using a laser engraver with a rotary table add on. That’s just the way it’s done for low volume production.
High volume custom tumblers are usually made with a different process like screen printing, pad printing, heat transfer decals, full color digital printing (can produce gradients), or acid etching. But those processes have a costly labor intensive setup not worthwhile for a one-off tumbler.
In the same way that 3d printing pays off against injection molding for small orders, so does physical engraving compare to the options listed above. What matters most then to a low volume process is unit cost, setup time, and of course how safe the tool is to use. So lets compare with those important criteria in mind:
Safety Concerns:
Laser Engraver: “Never run the machine unattended” is listed on every laser machine manual ever made for obvious reasons. But burning things is inherently hazardous in more than one way. Lasers produce smoke & soot that must be vented to the outdoors or else filtered inside because it should not be inhaled. Either way the fumes require high cfm fans, noisy enough to call for a dedicated shop to accommodate the tool.
CylinDraw: Mechanical engraving is a cleaner process since fumes and fire are not a factor. The physical byproduct is microparticles which can be safely contained with a steady flow of water or a shop vac. CylinDraw can readily accommodate either option. (Winner CylinDraw)
Startup Cost:
Laser Engraver: Varies greatly but you can expect to pay north of $3000 for a name brand 40W C02 laser plus another $500 for the rotary jig. But the sky is the limit for professional equipment. You can go the cheap route & get a generic K40 from eBay, if you want to trust such a device. I’ve found the hidden costs for direct-from-China CNC equipment to be substantial and usually come in the form of mystery problems with no seller support. A K40 has all the appeal to me as a $600 car from craigslist.
CylinDraw: At worst its $600 if you buy the machine fully assembled & deck it out with a water pump, a Dremel Stylo, & a Dremel 290. (Winner CylinDraw)
Recurring/Maintenance Costs:
Laser Engraver: The software is almost always a paid subscription if you want something decent. Expect to pay in the range of ~$500 for a lifetime purchase or ~$20/month for a subscription. If you vent indoors with a filter then you have to replace the consumable filter every so often. (~$50/yr) . The tool requires regular cleaning of soot from the internals to remain safe to operate.
CylinDraw: CylinDraw is a sturdy little tank with free software! The only thing you’ll be replacing is your (low cost) engraving bits every so often. And perhaps annually the $4 MG-90s lifter servo. (Winner CylinDraw)
Ease of Use:
Laser: Powerful software options come with a harder learning curve. Also lasers take tuning and often have to burn a bunch of bottles getting the tool dialed in.
CylinDraw: The software for the machine was designed to be as easy to use as possible. There aren’t many control parameters required. Just mechanically set the Dremel height, select the speed from a table to match your material & go. Of course using any new software has some learning curve so to counter my own bias I’ll call it a (Tie).
Quality:
Customers buying engraved glasses don’t care how it was made or how long it took. They only care about the quality of the result!
Laser: Resolution between 0.1-0.5mm. Focus of the laser has to be adjusted to achieve a specific engraving width. Can leave scorch marks at the edges, but if you use masking tape these go away.
CylinDraw: Resolution between 0.2-0.5mm, depending on the bit you use. (Tie)
Process Speed:
Laser: (Marginal Winner Laser) Initial setup will take longer but the actual engraving speed is quicker. Expect a few minutes to run a single piece.
CylinDraw: Takes a few minutes or potentially up to some order of 30 minutes to run a single piece, it varies with the complexity of the work (the reason why has to do with path planning as Ive discussed here). (I’ll add that CylinDraw’s initial cost is low enough that its feasible to buy 2 and run them in parallel to increase your process throughput!)
Overall:
In summary, CylinDraw is an order of magnitude less expensive in terms of upfront/operating/maintenance costs when compared to a rotary laser engraver, while offering an (arguably) much easier to use interface and equivalent output quality. So I am extremely pleased with the overall value offering a CylinDraw rotary engraver represents!
We are proud to announce a major new capability: CylinDraw makes for an excellent paper plotter!
The hardware needed to enable this capability only requires the addition of a large tube to wrap the paper around and two rubber bands to secure the paper in place.
We won’t sell tubes but you can use any tube 3.5-4″ (89-100mm) outer diameter & 10.5″ long, like this acrylic tube on amazon. Cardboard shipping tubes also work!
We also just released a new software update (V2.01) to facilitate the paper drawing option along with some other nice to have features. (Details listed later).
There are of course a variety of consumer grade paper plotters out there, so let’s use the most popular one as a basis for comparison, the AxiDraw by Evil Mad Scientist Lab
Tabletop Space Required: What desktop footprint does the machine need.
AxiDraw = 17 × 3.5 inches (430 x 90 mm). The open frame by design has to be twice as deep as the paper.
CylinDraw = 23″ x 6.5″ (584 x 165mm). The depth of the machine is noticeably smaller on my desk and I can use the bed of the machine to store pens/paper without them being in the way. (Winner)
Maximum Paper Size: The usable drawing space on both machines fits a standard 8.5″ x 11″ paper. This one is a (Tie) for the base version of the machines, though AxiDraw does offer a separate larger version.
Max Drawing Speed: How fast can the machine move.
AxiDraw = 380 mm/s. (Marginal Winner)
CylinDraw = 85 mm/s.
Note that pen drawing is typically done at <25mm/sec on both machines, so the top speed is only differentiated while the pen is lifted. Faster moves here shave off a tiny percentage of the overall job time. To CylinDraw’s credit, the rigidity of the machine enables you to make very fast drawing strokes without fear of machine wobble showing up on the paper. Though you would almost never want to draw pen strokes at high speeds because pens can only lay down ink so fast without fading.
Versatility: How many different ways can the machine be used.
AxiDraw: The open frame design can draw on literally anything flat. Paper, an open notebook, a closed laptop cover, etc. Can use normal pens or fountain pens. Cannot engrave without significant modifications.
CylinDraw: Can draw on any type of paper you could wrap around a cylinder, but not something like a notebook. It cannot hold a fountain pen currently, but with a new part it easily could. It can readily engrave and it works on any type/size of cup of course! (Call it a Tie as this is unquantifiable)
Drawing Resolution: The smallest controlled move the machine can make.
AxiDraw: Has a resolution on both axes of .0125 mm/step. (Winner)
CylinDraw: On paper it has .01 mm/step on the linear axis & .1 mm/step on the rotational axis on the 4″ diameter tube that I used for paper. The resolution on the rotational axis increases proportionally with smaller diameter tubes. Since pens typically draw with a stroke width of 0.1-0.5mm, the resolution is imperceptible is most cases anyway.
Reproducibility: How well successive identical lines overlap.
AxiDraw: ‘Typically better than 0.005 inches (0.1 mm) at low speeds.’
CylinDraw: At least as good. The closely packed closed-frame designed for the rigidity needed to engrave makes for extreme reproducibility with a pen. (Call it a Tie because it is hard to measure.)
Price: (prices as of this writing)
AxiDraw: $475 with free shipping, no assembly required.
CylinDraw: $260-$500 with free shipping, total out of pocket price depends on if you want to assemble yourself or buy it fully assembled. Most folks have opted to build it themselves from a kit. (Tie, Depends)
Software:
AxiDraw: Open Source ‘Inkscape + extensions’, or a small selection of alternatives like AxiDraw server. Works on Mac, Windows, and Linux computers
CylinDraw: Open Source ‘CylinDraw Control Suite’ only. Currently only works on Window computers but a Linux option is in development. No apple support.
All options are free, open source, & do not require a paid subscription for any level of software access. Both software stacks allow you to convert bitmap images into drawable vector paths, or let you import SVG files purchased from a 3rd party. That AxiDraw functions on more operating systems is a big win though it doesn’t matter to the people who only use windows anyway. Also, being built in Inkscape there is a very deep level of image manipulation control built into the system. In my opinion the AxiDraw workflow is better suited for a tech savvy audience.
In contrast, CylinDraw software was designed primarily to be as easy to use as humanly possible. The workflow requires fewer clicks and less understanding of vector conversion & machine control. CylinDraw also includes a built in path optimizer and I don’t believe Inkscape has that feature. Additionally, for the very few users that want to modify either open source software, I think they would find it easier to modify the source code (arduino + Processing3) of the CylinDraw. This is hard to call without my own bias playing a role and I think the verdict depends on the user. A casual crafter would enjoy the simplicity of CylinDraw, but since most plotter users are tech savvy and would probably vote for Inkscape here I should call it that way. (Winner AxiDraw) (I’ll add that neither software works for the other machine currently.)
Multicolor Capability:
AxiDraw: To the best of my knowledge multicolor-all-in-one-jobs are not directly supported in the software, though that doesn’t stop artists from making separate consecutive jobs to apply different colors. CylinDraw: The software natively supports multicolor jobs to make 1 color as easy as 12. The software consolidates all same-color strokes together and prompts you to change the pen to the next color & shows you which color it wants. It also automatically sorts the color order by brightness so that light colors aren’t smearing around dark colors already on the workpiece. (CylinDraw Marginal Winner)
Overall:
Both machines bring a completely different approach to the plotting process and their individual appeal varies greatly depending on the user.
People who use Apple products, have stronger tech skills, and/or professional aspirations for making paper plots surely have their needs better met by the AxiDraw. (Their product is great and this article in no way intends to suggest otherwise.)
On the other hand, people who don’t like Inkscape & view software tinkering to be unpleasant, who enjoy building projects from kits to save money, and who enjoy making art on a variety of mediums for hobby purposes will find a compelling value proposition in the CylinDraw.
While the paper drawing capability of CylinDraw is good, it is still of course a tangential benefit to the main attraction of drawing/engraving on cups. Something that no other commercially available plotter on earth can do!
Its fair to say that preferences vary greatly with the end user and both machines have unique qualities, strengths/weaknesses, and that comparison is largely apples to oranges. Doing so was just to provide you with a frame of reference. There’s also no reason a person shouldn’t own BOTH machines. 🙂
…
Software Version 2.01 Update:
Firmware: Caps the maximum/minimum speeds so you cannot attempt to move at a rate that would cause the machine to lose steps. Fixed a bug that improperly adjusted speeds in certain cases. (A non-issue for DePixelized SVGs which is why I didn’t notice, but for SVGs from anywhere else you would notice straight lines turning out curved.) (SW is backwards compatible with arduino firmware v2.00 but we still recommend updating your fw to the current rev)
DePixelizer: Added (see Log_DePixelizer.png in the System folder). Added Resolved a bug that created a ghost effect in the GUI after exporting jobs.
Job Creator: Added the gui selectable option to specify that you are drawing on paper. Auto-detect & remove preview from large job files to improve loading time. (Extremely large svg files were formerly causing some users to not be able to open the program.) Updated slicing algorithm to better remove the number of jumps in a given job. Reduced overall slicing time for extra large jobs! (this wasn’t a problem before but now drawing on paper creates much large jobs and so the need came up). Made the path optimization a selection option available in the Help menu. (Because for non-DePixelizer SVGs found on websites such as https://plotterfiles.com I found that trying to optimize them made the jobs take longer.)
Run Mode: Auto-detect & remove preview from large job files to improve loading time when opening the program. (Clicking on the image in the center of the screen still opens CylinDraw JobViewer so you can still see the entire job if you want.) Added the ‘Jump to Line’ button so you can go to any point in the job you want.
Notes on pens used for illustrations at top: The Bic 4 in 1 multi-color pen is a fun general place to start. We used a dollar tree version for the Buzz lightyear image, though we’d recommend buying the name brand version if buying a multipen.
Pilot G2 appears to be a good value option for pens and that’s what we used for most of our drawings shown above. We’re picking up a big color variety pack!
Roller ball pens do have trouble drawing lots of consecutive dots because the ball doesn’t get a chance to roll. For the portrait of my wife I used a Promarx UltraFine 0.5mm technical pen which uses a solid tube nib better suited for lots of dots! There’s a wide world of pen types to explore though!
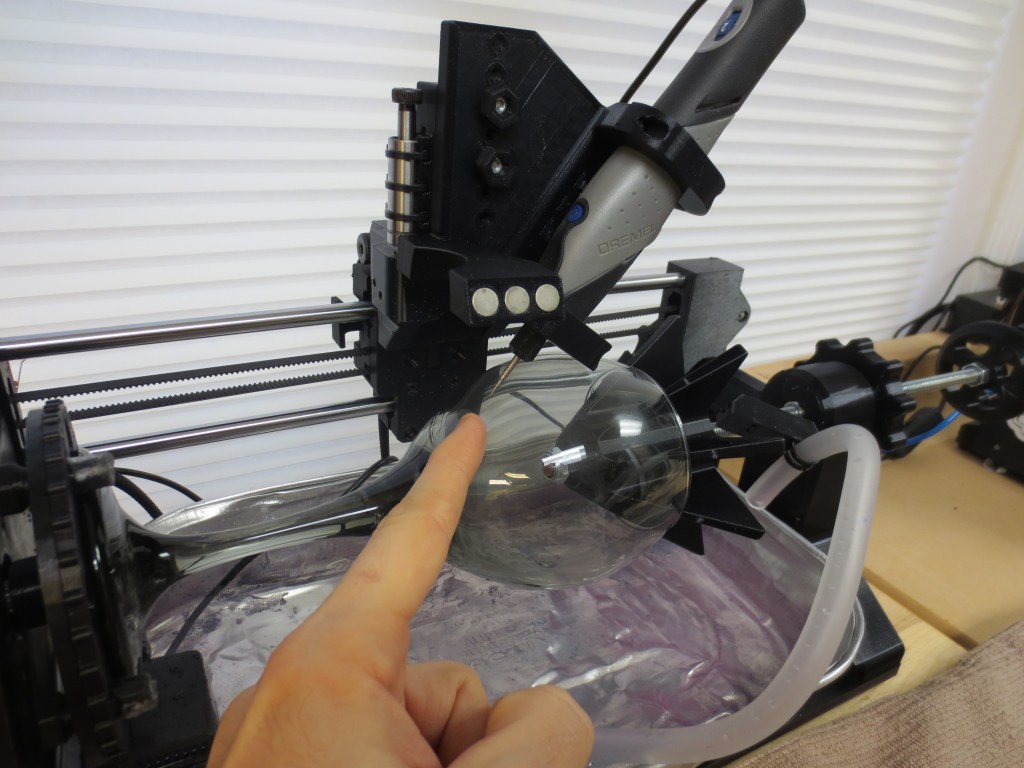
Engraving off the coating from a metal tumbler is one thing, but making any kind of dent in pure stainless steel tumblers is quite another.
Engraving stainless steel is difficult because the material is so hard! This example is the best the Dremel Stylo can do on stainless… It definitely scratches it, but its much more faint than I want since the Stylo leaves behind a smooth finish & there is nothing to catch the light.
Pure uncoated stainless is difficult to scratch!
So we brought in the big guns…
The Dremel 290 is a diamond tipped vibratory engraver that can scratch & dent pretty much anything. It leaves behind a textured sort of emboss that feels almost like a finely knurled surface but the result is high contrast and clearly visible even on a shiny all silver cup!
First Try, I set the stroke width a bit low but immediately I could see the potential for detail of this new tool
The tool is cheap, simple, no coolant is necessary, & seemingly it never wears out, however… it is loud! This setup is one for the garage or dedicated workshop because the sound of this tool hitting a metal cup is not ignorable. We recommend the use of ear protection. (It just occurred to me that I might be able to dampen the sound by inserting some foam or paper inside the cup. Of course you could always put a foam box around it too, that would be enough.)
Dremel 290 has a depth control knob on the side, settings 1-5 with 5 being maximum depth. The vibration frequency is a function of your 120VAC frequency, so that is not adjustable. I choose 5 so as to get a strong mark.
For this tool I recommend slicing images at a 0.2mm line width, then running the job at 15mm/sec @100% vibration intensity.
An experienced engineers motto: “Slow is Safe, Safe is Fast”
The Dremel 290 also works on a regular coated aluminum/steel bottles, again with the tangible texture.
For reference, the black printed part model name is “ChiselMount_Dremel290_1xOPTIONAL.STL”, found among the other officially released CylinDraw Parts. The tool is held in firmly place to its mount with a couple cable ties.
Next time we will be discussing the details of our value proposition against the established technology. CylinDraw Engraver vs Lasers!
The engraving process produces ultra fine particles that are too small to see which need to be collected for human safety.
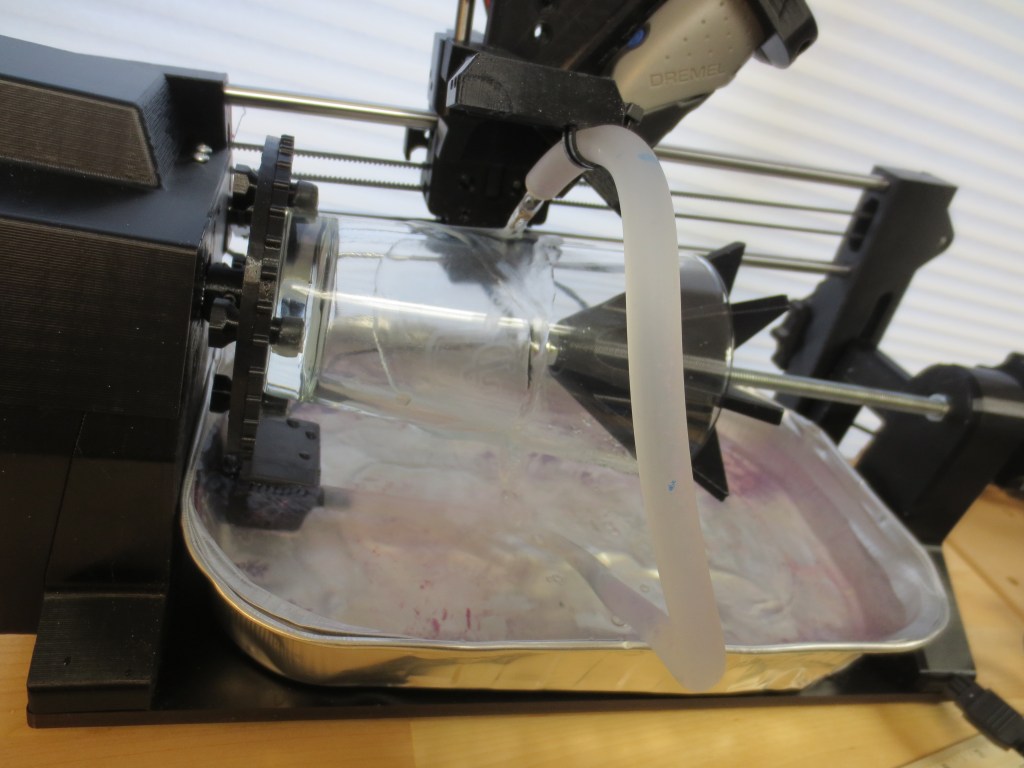
Our original design calls for a mounted shop vacuum and a magnetically mounted Lexan shield.
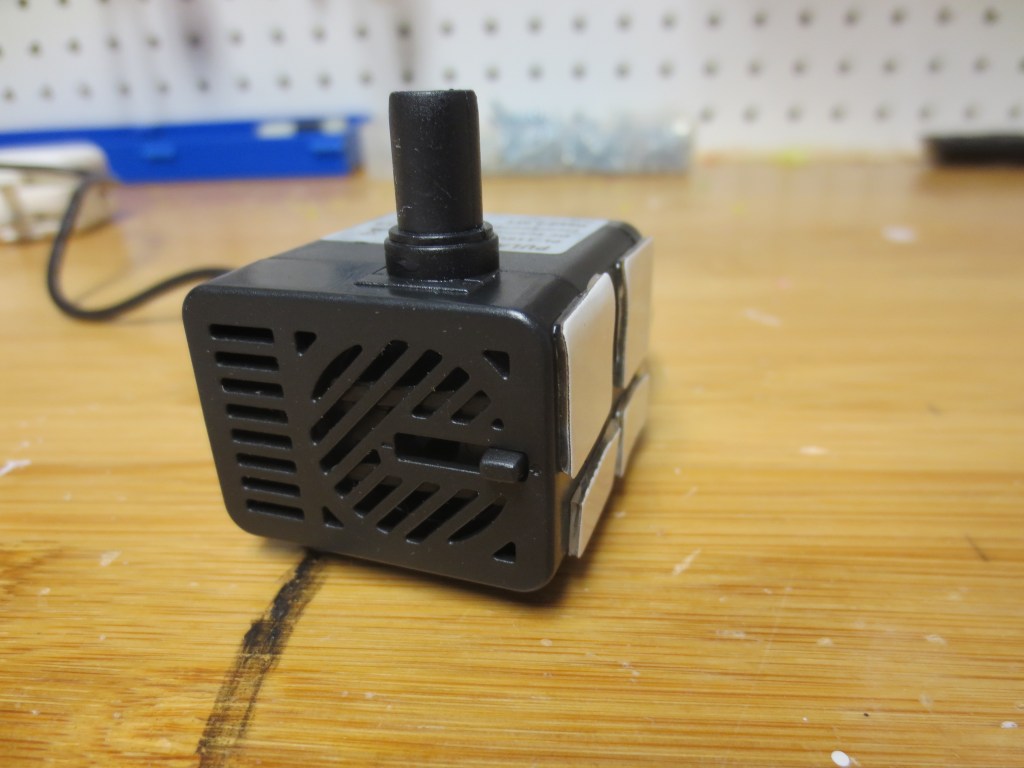
This setup is simple & works great! Though its probably best used in a garage because a shop vac can be noisy. For use in an office or apartment I wanted another option…
So with the addition of one tiny 3d printed part, a fountain pump, & a 12″x7.5″x2″ aluminum pan I built a water cooling system!
I also added an optional printed shield/cover shown on the left side of the machine as a splash guard just in case!
Its an improvement all around! Its totally silent & the water cools the bit as it contains any airborne particles.
(The appearance of an aluminum foil tray is not our #1 choice to be sure. I’ve got a design for a slick black vacuum formed tray, but I wont pull the trigger until a later time.)
In addition to new hardware we improved our technique as well.
We learned through iteration to make software V2 smart enough to always keep the motors energized so you never lose your rotational position, even when a job is complete.
Keeping track of your position matters because if you lose power during a job you want to be able to pick up where you left off. But since a cup is round, there is no hard stop to home against. So I think its good practice to make a registration mark at the tool home position. A tiny dot as shown in the next picture, so you can line up your tool exactly where it was, even after powering down & removing/reinserting the cup!
We found this necessary after breaking a few bits during or experimentation process, trying to figure out the best feeds & speeds for different materials. Fortunately, this process will be easy for you since you can copy what we know works well!
Feeds & Speeds:
Tool Speed: The rotary speed of the Dremel tool; Controlled by the Dremel.
Feed Rate: The rate of motion of the machine; Controlled in Run Mode.
The default feed rate is a good value for drawing with a pen, 50mm/sec. That is, the pen will draw a 50mm line (2inches) in one second. Though, short line segments will take slightly longer because the machine also controls acceleration rates.
Acceleration control is necessary because the moving parts (tool & cup) have mass and are moving quite fast. If you try to move full speed then change direction suddenly the motor might stall & lose control of its position. The default acceleration values are adequate for 99% of cases. Though on the large glass stein in the first picture I found that I needed to reduce the acceleration rate by half.
Below are proven save speeds & feeds for engraving different materials.
Pure Stainless Steel: Not recommended with this tool.
Real Stainless steel is a very hard material, well known for its resistance to rust and poor machinability. The Dremel Stylo will scratch it though the result can be more faint than would be desired, since there is no contrast as with removing a painted coating. So for this material we recommend a different tool, but that is a topic for next time!
This winter we’ve been experimenting with our engraving process to lock down the best methods for different materials & cups. In this series I’ll be sharing some interesting tips we learned along the way in a small easily digestible format.
First enjoy this short teaser clip & these beauties that resulted.
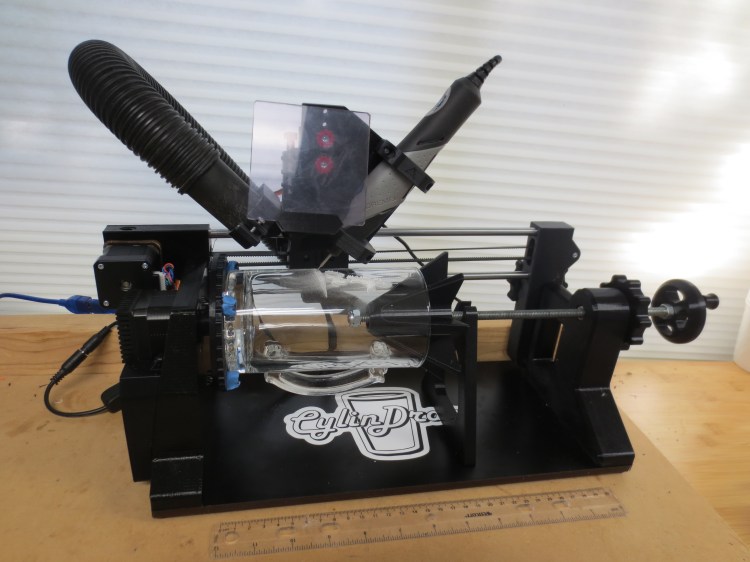
CylinDraw’s standard engraving attachment is a mount for a corded Dremel Stylo Engraver.
So chosen because the Dremel brand is the highest quality consumer grade rotary tool on the market. (The next step up IMO is dental drills!)
We use the Stylo model specifically because it is so light weight.
Tool Speed Control:
Dremel Stylo has a rolling dial to adjust speed from “1 to 5”, and the product specifications list the RPM to range from “5,000 to 22,000 RPM”. So we approximated the tool speed at each dial setting:
dial 1 = 5,000 rpm* (speed may reduce under load @ dial 1)
dial 2 = 9,250 rpm
dial 3 = 13,500 rpm
dial 4 = 17,750 rpm
dial 5 = 22,000 rpm
This information is helpful for estimating what the appropriate motor feeds and tool speeds should be. (More on that another time, its easy!)
Bit/Burr Sizing:
The Stylo is equipped with a spherical diamond studded engraving burr. It looks like this:
The smallest burr size we can readily get is a 0.5mm ball end, which can engrave a 0.2mm wide line. (So measured with Mitutoyo calipers & magnifying glass!)
Finer lines always look better, BUT jobs with fine lines take more time because there are simply more paths to travel through.
We tested out larger bits and interestingly found that we could predict the line width using a ratio & known info to predict unknown info.
I.e. a 0.8mm ball end burr was estimated to produce: 0.8/0.5 * 0.2 = 0.32mm line width. The actual line width was measured at 0.35mm!
Since this estimation works so well we can reasonably be sure that a 2mm ball end burr will have an 0.8mm line width (or 2.0/0.5*0.2 = 0.8mm) for example.
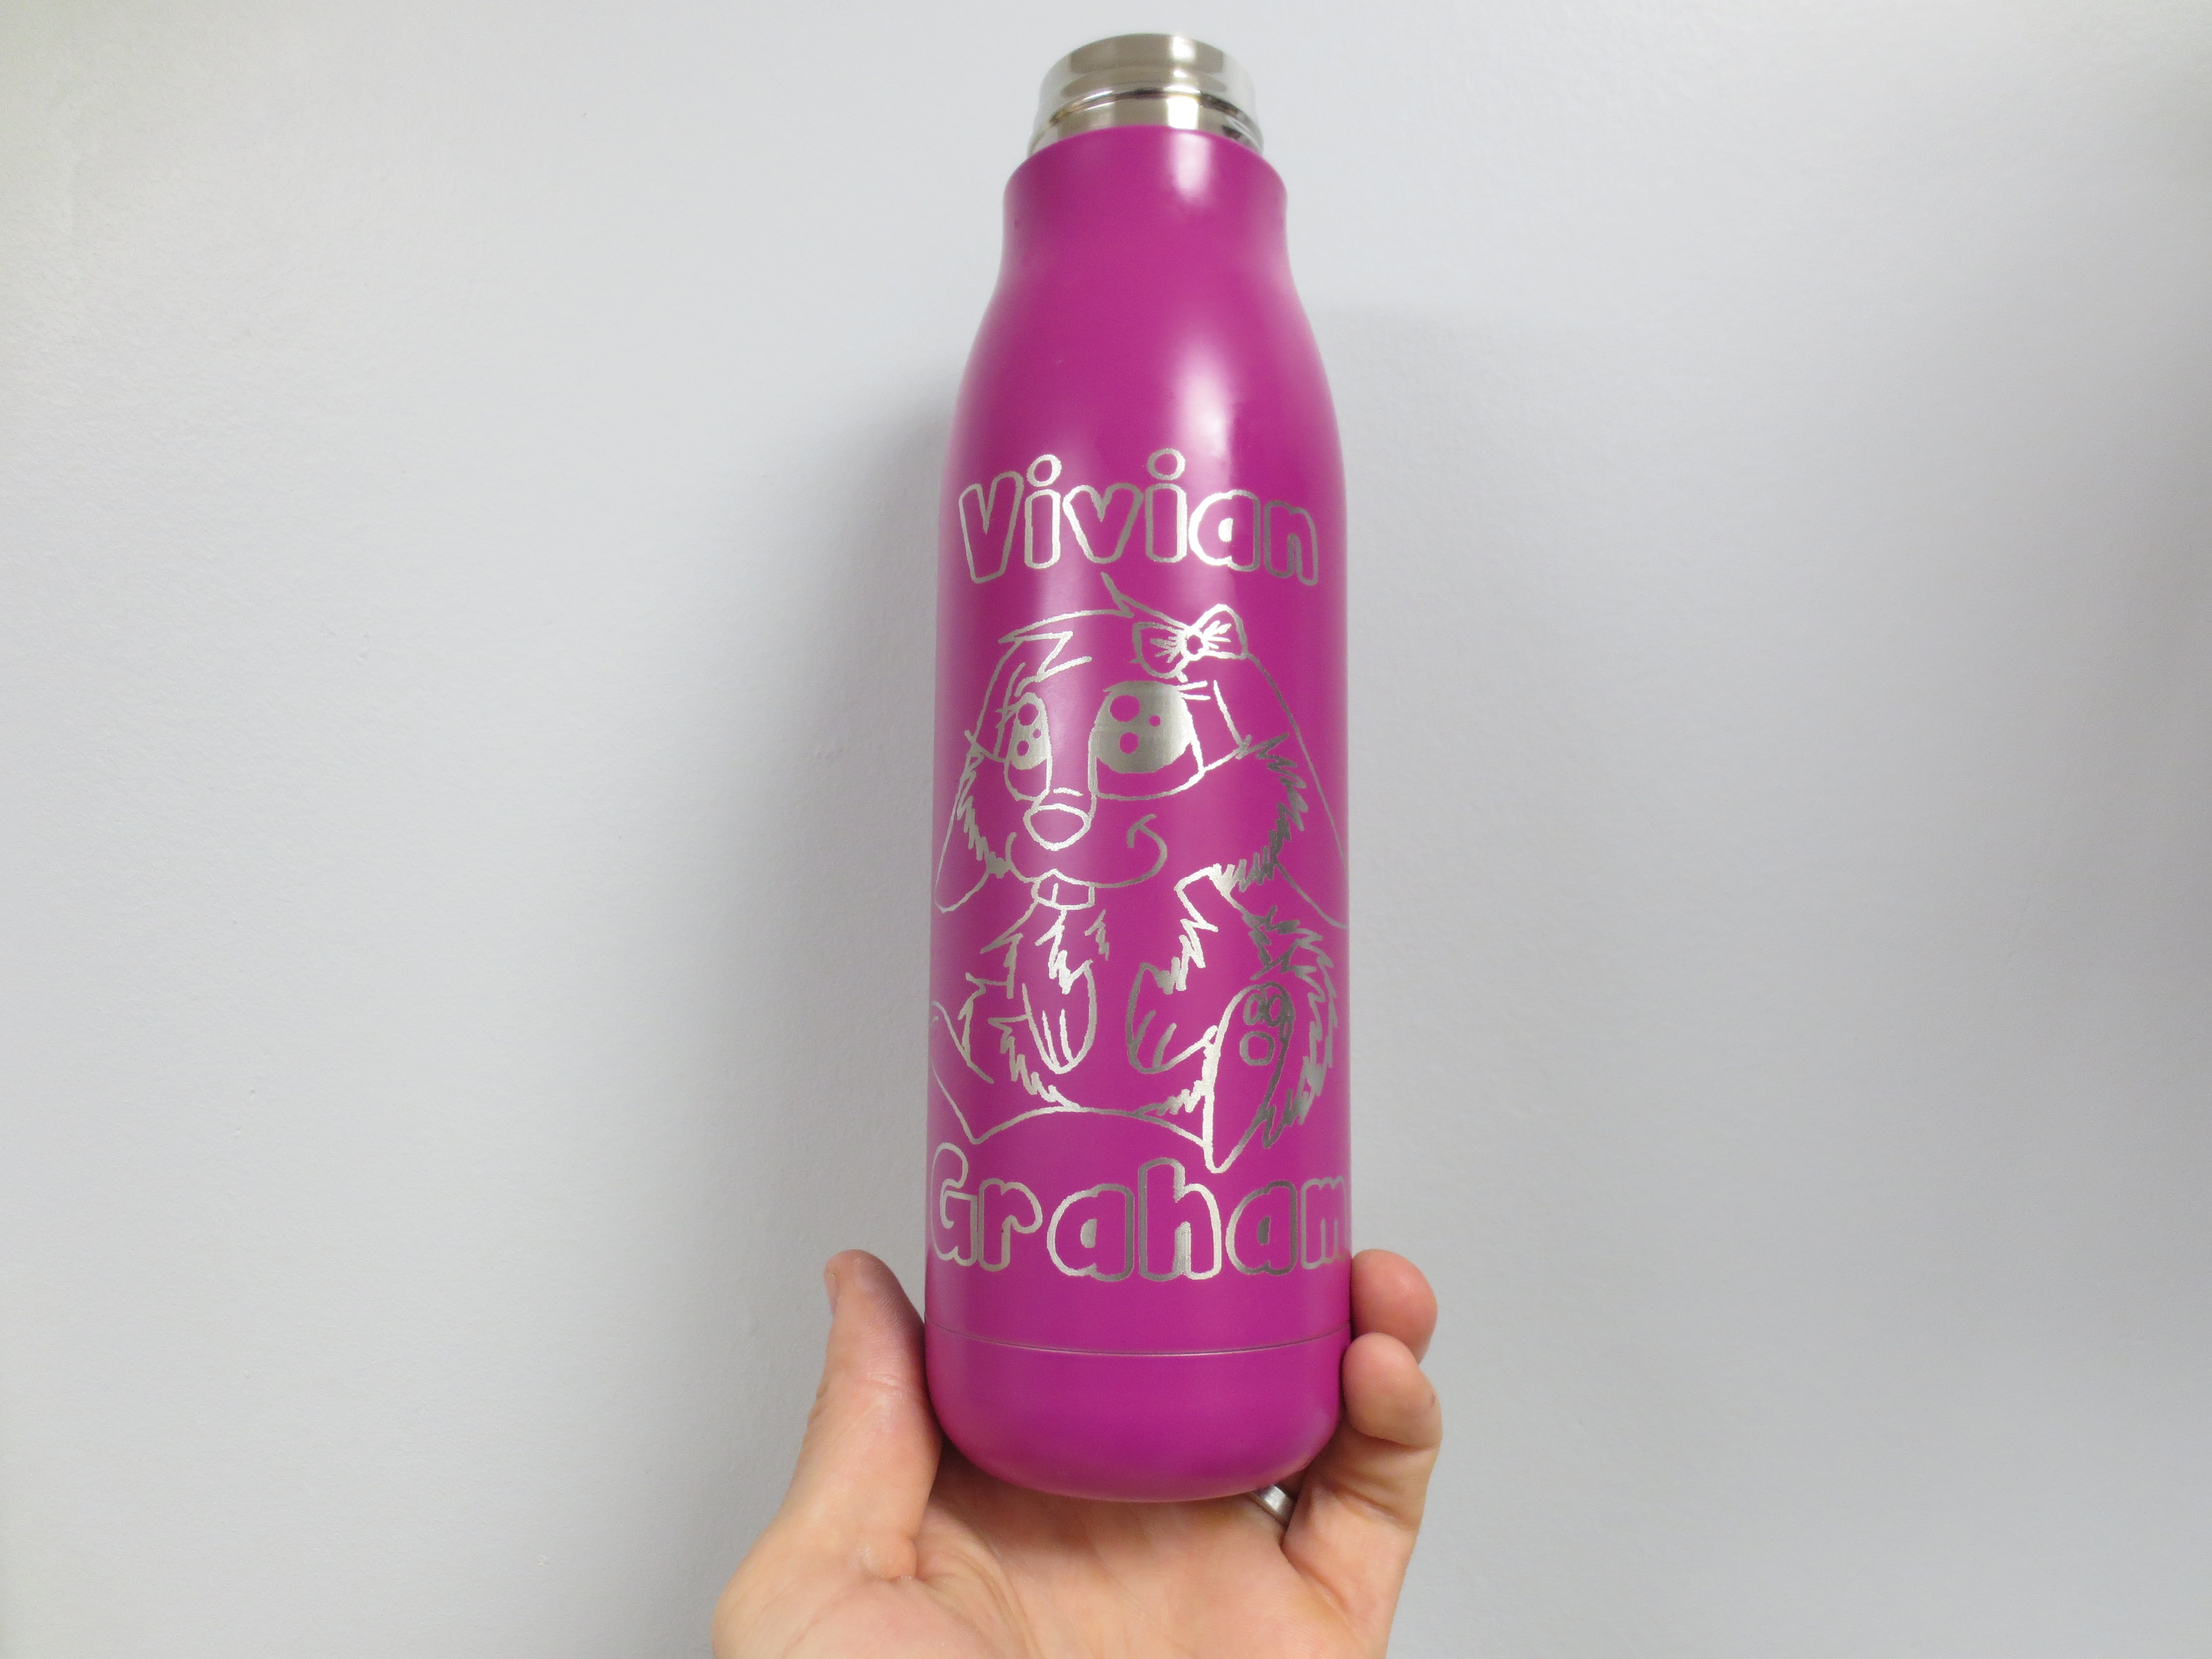
We used a 1.0 mm ball end burr on this Mando tumbler because it was so tall I didn’t want it to take forever. Overall I like how it turned out, but I know I can do better!
I think sticking with the smaller bit sizes & spending a bit more time in the DePixelizer software could have make his features pop more. IMO finish quality is more valuable than speed, because after a cup is made no one cares how long it took, only how good it looks! So its best to work at the finest resolutions even if the job takes an hour because of it.
Anyway that’s all for now. Here’s the full video that that short intro clip is based on. It includes the full process of preparing the imagery used on that bunny tumbler and a demo of some new Software V2 features.
Happy new year! Its a busy time (as always) for me but life is good!
2021 (& 2020) saw me stuck in a tight loop most of the time. A dearth of traditional ‘adventure’ seems an unavoidable reality of the pandemic age. That, in addition to simply being an attentive parent. (I have 2 in diapers!)
Somehow I find enough odd hours to build many interesting things & while I often sell them online I generally have done a terrible job of sharing them. I’m going to try to do better at sharing my maker-oriented content this year!
I’m starting with sharing the source code & premium access for the CylinDraw Control software!
My thinking has changed & rather than worry about protecting proprietary content it is far more valuable to focus on getting better feedback & more engaged users. If any of you are interested in learning to program in the Processing3 language there’s a lot of good example content in there! That plus I got tired of monkeying with license keys. 🙂
This week I released software & firmware Version 2. A major revision as it is incompatible with the initial release. Notable features include:
*DePixelizer– Dithering button added. (Allows for shading with spaced dots.)
I like the look on the cup though its a bit big for the cup size. Another lesson is that dots may appear darker than strokes because they are in contact longer. I was drawing super fast so reducing speed wouldn’t have hurt.
*Job Creator–
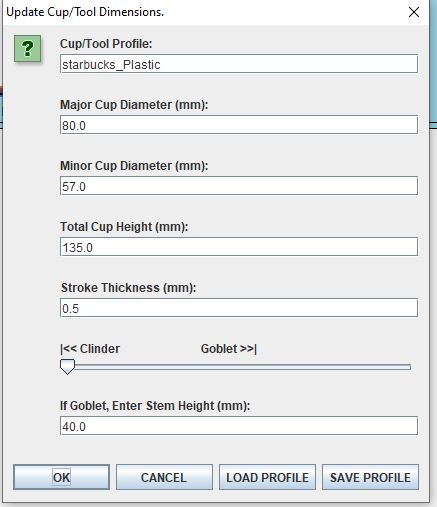
A button to save/load tool profile presets so you don’t have to remeasure & type them in again for cups you’ve already done.
Simplified bounding box display for large jobs to prevent the system from lagging on large files. This is particularly useful for engraving since the engraver jobs tend to be higher detail.
Also added a bounding box drawing motion to the beginning of all jobs for convenience (gives you a physical preview of the limits of motion as a final verification.)
Fixed tenacious bug that reset your image orientation on the cup after saving it (which was preventing making minor adjustments to jobs then resaving.)
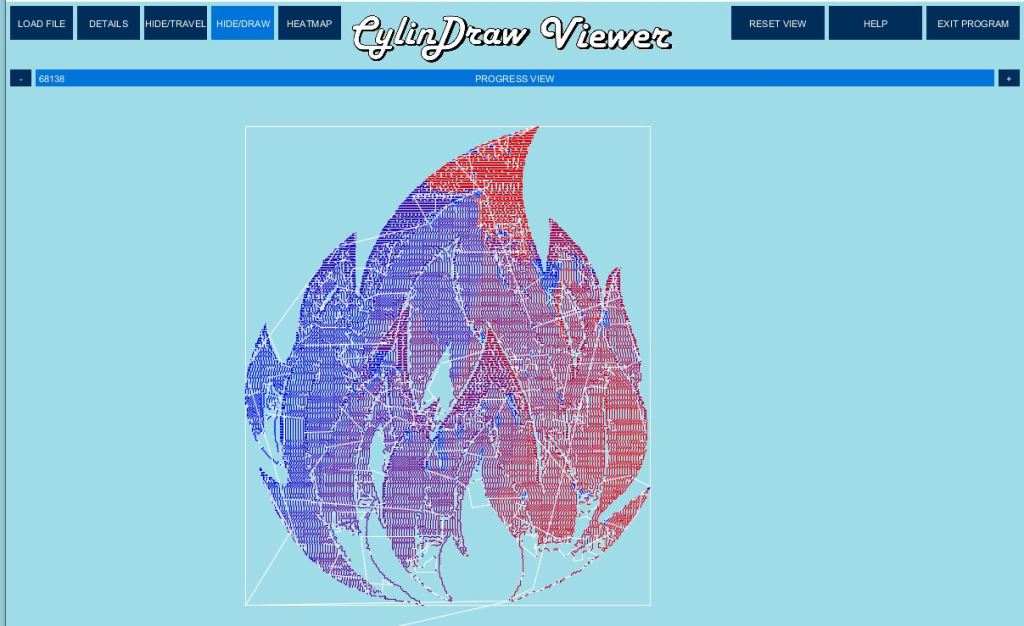
*Job Viewer-Added Heatmap option to display in color (red to blue) the order of drawing strokes. Just for fun really, to give you an idea of how the path optimizer ended up.
dithered fire
*Run Mode–
Smarter USB device detection. Run mode automatically detects usb devices & tries to link up to them automatically. But I discovered that it could accidentally get stuck trying to connect to my phone while I was charging it! Now the program is smart enough to verify a specific return communication from the usb device, or else it keeps searching the other ports.
Added data logging of jobs to capture the rapid communications that get displayed on screen.
We’ve some other new relevant software releases, new hardware tweaks, & engraving tips ill save for another evening. I think shorter is better if I want to attempt more posts this year.
On Saturday mornings you can usually find me doing some sort of random craft project with my favorite tiny human. My daughter is a high energy curious 5 year old and I’m always trying to feed into her enthusiasm with open-ended toys, simple science experiments, origami, or drawing & coloring.
Much of the coloring she delegates to me (of course) and lately while filling in numerous random shapes I’m reminded of an interesting challenge I encountered while playing with an open-ended toy of my own.
Almost immediately after building and experimenting with my robotic cup plotter project I realized that smart path planning of drawing strokes is critical to getting jobs completed in a reasonable amount of time.
Plotters, 3d printers, & cnc machines in general can be mesmerizing to watch, but fascination can turn to frustration when poorly planned tool paths remind you just how dumb these machines really are.
“Gahhhh why is my machine drawing little bits all over the place rather than finishing off an entire area before moving on?”
Last month I shared how plotters use vector graphics in order to build a list of toolpaths needed to map out jobs, and I doted on Potrace for being the most common program used to generate vector graphics.
But as great as Potrace is, one thing is does not do for you is optimize the path order.
Optimizing paths is simple in theory, and yet impossible to get perfect in even a moderately complex job. A very interesting problem!
..
Lets say my kid asks me to color the inside of a circle, a process known as hatching. The optimal path algorithm is obvious, start at one side, swoop back and fourth repeatedly until the shape is filled.
Hatching is not supported by Potrace since it is not necessary for displaying images on a screen. It produces an outline & simply declares the interior to be a certain color.
To create the filled-in effect on a physically drawn image hatch paths must be calculated & then combined with the outline. It is also a tool-specific process because the appropriate spacing between strokes changes with the diameter of the pen you use.
Here I’ve illustrated the tool path of a hatched circle and I set the line color to linearly change from red to blue as the drawing progresses for visualization purposes. It looks exactly how you would expect.
Now imagine kiddo giving me a more complex shape to fill in. The decision on how to optimally proceed is much less obvious. Marker in hand, my instinct is to just scribble furiously everywhere to finish before she gives me my next task.
A more computer friendly approach we can try is to use is rasterization rendering. Start from the top corner, swoop across the entire width of the image only touching pen to paper where appropriate, move down one stroke width, & repeat swoop in reverse direction.
The path of motion is dead simple and this is how laser engravers usually generate paths. It produces a lot of wasted motion but they can get away with it because lasers can turn on and off instantaneously, so the benefit of operating at high motion speed far outweighs the time spent travelling over space that won’t be engraved.
Here’s what that looks like. (The white lines are travel-only-paths, wasted motion.)
Rasterization rendering is also how computers refresh pixel colors on your monitor, and its how the DePixelizer program I wrote about last time converts images into vectors.
But this is not a very good plan for a plotter. (Or for me with marker in hand for that matter.)
The pen has to be physically lifted & lowered every time you transition from a travel-path to a drawn-path. A roundtrip process of ~1 second on the CylinDraw, deliberately limited in speed to prevent the pen from bouncing.
The cumulative effect is significant. The example above has 2048 individual lifts, and a total of 6130 separate points of interest to visit to complete the job.
Ideally we want to minimize the number of pen lifts, minimize the total distance of travel-only-paths, and if possible keep the average drawn-line length as long as possible. Long straightaways are better because the bot can spend more time at high velocities & waste less time accelerating/decelerating.
We have a long list of points to visit only once and we want the shortest possible route, effectively we’ve run into the travelling salesman problem.
…
I wanted my program to be able to import any kind of vector files, not just those made with the DePixelizer program, so I had to figure out a way to generate hatching using only the perimeters of shapes.
This is what I came up with.
Iterate over the SVG to separate out all the enclosed objects. Then for each closed object individually:
Sequentially slice the object with an array of strokes spaced apart by the pen diameter. (blue lines) Everywhere the lines intersect the object will create at least 2 points of interest the bot will want to travel to. (Note there will always be an even number points of interest in a slice.)
Collect both points of interest sequentially and add it to a running list, along with the color of the shape. Move directly from the last point found to the next point found, unless…
…unless the number of points found in a slice is different than the number found on the previous slice. In that case create however many new lists (groups of sequential points) necessary so that each group is only getting two new points per blue slice line.
When the end of the object is found, make a new blank master list & iterate over the lists of groups of the same pen color seeking the next nearest start or end point of the entire group. (greedy algorithm) If the next nearest point was the final point of a group then reverse the group order before adding it to the master list.
Using large groups as shown wasn’t strictly necessary; I found the system also works if you simply consider each 2 point line segment to be its own (tiny) group, since all groups are combined at the end & reordered with a greedy algorithm anyway.
However, this had a surprising & unintuitive effect on the result. I found that the additional constraint of large groups consistently had multiple benefits over line-segment-sized-groups.
Large groups prevented the greedy algorithm from making a short sighted decision to seek a locally optimal point at the cost of creating numerous inefficiently disjointed groups later. (There’s probably a parallel to be drawn here about the negative effect of frequent context changes on your brain/productivity)
Similarly, I found the starting position had an enormous effect on the greedy algorithm’s output. I found it was almost always best to start combining groups with the very first point & group being at one extreme side, then to finish off with the outline last since that may start or end anywhere.
Another benefit of large groups, the overall time to run the hatching code became near instantaneous because there are far fewer items to sort. The nature of sorting is such that doubling the number of items to sort on a single list will take more than double the time to sort. (I.e. Its quicker to sort 10 separate 10-book-shelves than a single 100-book-shelf.)
One big challenge was ensuring the transfer motion between groups did not mistakenly leave the pen down in cases when it should have lifted off the paper. To resolve this I simply assumed a lift was always necessary if the next group’s point of entry was more than a pen diameter away.
The final result is 31 total pen lifts & 2900 separate points of interest to visit. Neato.
Obviously there are a lot of ways this process could have been done, certainly many better than mine in different ways. At this point you’d have to start varying the slice direction & make the model iterate multiple times to try to get even slight improvements.
My main goal was not perfection but rather to ensure the output is error free every single time. For a system like this anything less than 100% reliable is 100% worthless. Reliability>>Perfectly optimal!
That’s why I used many different images to practice on while I figured all this out. Otherwise I’d risk ending up with a system ‘designed to pass the test’, that fails as soon as a unique situation comes along.
Other examples.
One final trick I came up with before I wrap up this topic.
Making progress & learning requires iteration, the faster you can iterate the faster you can learn.
The deliverable output of my slicing program is my variant of g-code, readily machine readable but not readily human viewable. It’s literally a text file thousands of lines long and at the beginning I had to copy & paste it into a g-code reader just to check how it worked out.
So to improve my ability to make progress faster I designed the system to output an SVG file that displayed the job preview and then embedded all the g-code at the end of that file between comment brackets so it didn’t affect the SVG format.
Then I installed a package that let me view SVG files in the thumbnail on my computer and I was able to organize experiments, review the results, and iterate much much quicker.
That’s all for now. Next time I’m looking forward to sharing a raspberry pi automation project.
In my previous post I shared an introduction to a cup-specific plotter project I developed over the last couple years. This time I want to dive a bit more deeply into appreciating some of the art you can produce with this type of machine.
This article has a good bit of detail and I don’t want to discourage someone looking for quick solutions or a casual hobby, so Ill mention upfront that there are many free tools available that allow you to easily use the techniques mentioned here to make cool art without sweating all the underlying details. But maybe this will inspire your curiosity to dig a little deeper and come up with some of your own.
…
Multiple well-meaning people have asked me how quickly the CylinDraw can pump out drawings, and if it can be made to automatically swap out cups & pens.1
The tool is quick for what it is, but thinking in terms of automation & cups per hour is not the best way to appraise its value & potential.
To them, a traditional pen plotter must seem like an odd choice of technology for me to choose to develop. In the world of printing tech, creating images on paper by tracing thousands of individual pen strokes cannot possibly compete with the efficiency and resolution of modern inkjet printers.
Even today’s architectural paper size “plotters” are in reality inkjet printers with a bigger frame. The traditional pen plotting process is antiquated for that purpose, so why develop a new hardware platform with it?
A pen plotter is fun to build & use, mesmerizing to watch, and there is something uniquely fun about pen-drawn art!
The pen drawn aesthetic has timeless appeal, in the same way that a handwritten letter is more enjoyable than an email or mass produced pamphlet. The information conveyed may be the same but the value is different. The efficiency of the process used to create the art has an inverse effect on how personal the result feels.
You wouldn’t judge a calligrapher primarily based on how many letters they can pump out per minute, because a more important aspect of appreciating their work is understanding the thought processes, skill, and effort that went into producing it.
…
Lets say I found an image online I like enough to decorate my cup with or print out and hang on my wall. This chiseled looking guy will do.
As you can see, this image is small but conveys a ton of detail. That’s because it is a matrix consisting of 180 by 215 individual pixels, each of which can be displayed on my computer monitor as a unique shade of gray. The digital image itself is a raster graphic which is great for displaying extreme color detail.
Now an interesting question,
How does an inkjet printer print in grayscale, using only black ink?
When I hit print on my office printer, my computer converts each pixel in that image into yet another smaller matrix of microscopic dots.
Each of those dots will be the target for aerosolized ink which is sprayed from row of tiny nozzles. (A good photo inkjet printer can print 1440 dots per inch).
On paper, the color of the image pixel is communicated by varying the density of those ultra tiny dots. Black is 100% dots, white is 0% dots, and gray is achieved via optical illusion (called dithering) by having some number in the middle.
The colors appear to blend as you use smaller dots.
The printing process is fundamentally different on a pen plotter. The tip of my pen is a single point 0.1-0.5mm wide, too large to reproduce a gray looking pixel with that method. The plotter armed with a single pen can only draw a large black dot or nothing at all, with no option in between.
A raster graphic is not directly usable.
To accommodate a plotter that uses a single pen what we need is a black & white vector graphic, a discrete mathematically defined image consisting of explicit curves readily parsable to derive the complex paths the plotter will need to follow.
But how do you convert a raster image into an equivalent vector graphic?
That’s part of the fun, there’s no precise ‘equivalent‘ way to do it, only endlessly different artistic interpretations.
To get started on any sort of vectorization we have to consolidate the number of colors in the image down to the number of ink pens that we will use. In this case just black & white for a single pen.
This is a core challenge of converting image types. Where a raster might have many shades of gray that merely imply an edge and let your imagination complete the unspecified feature, a rigorously black or white vector is less forgiving.
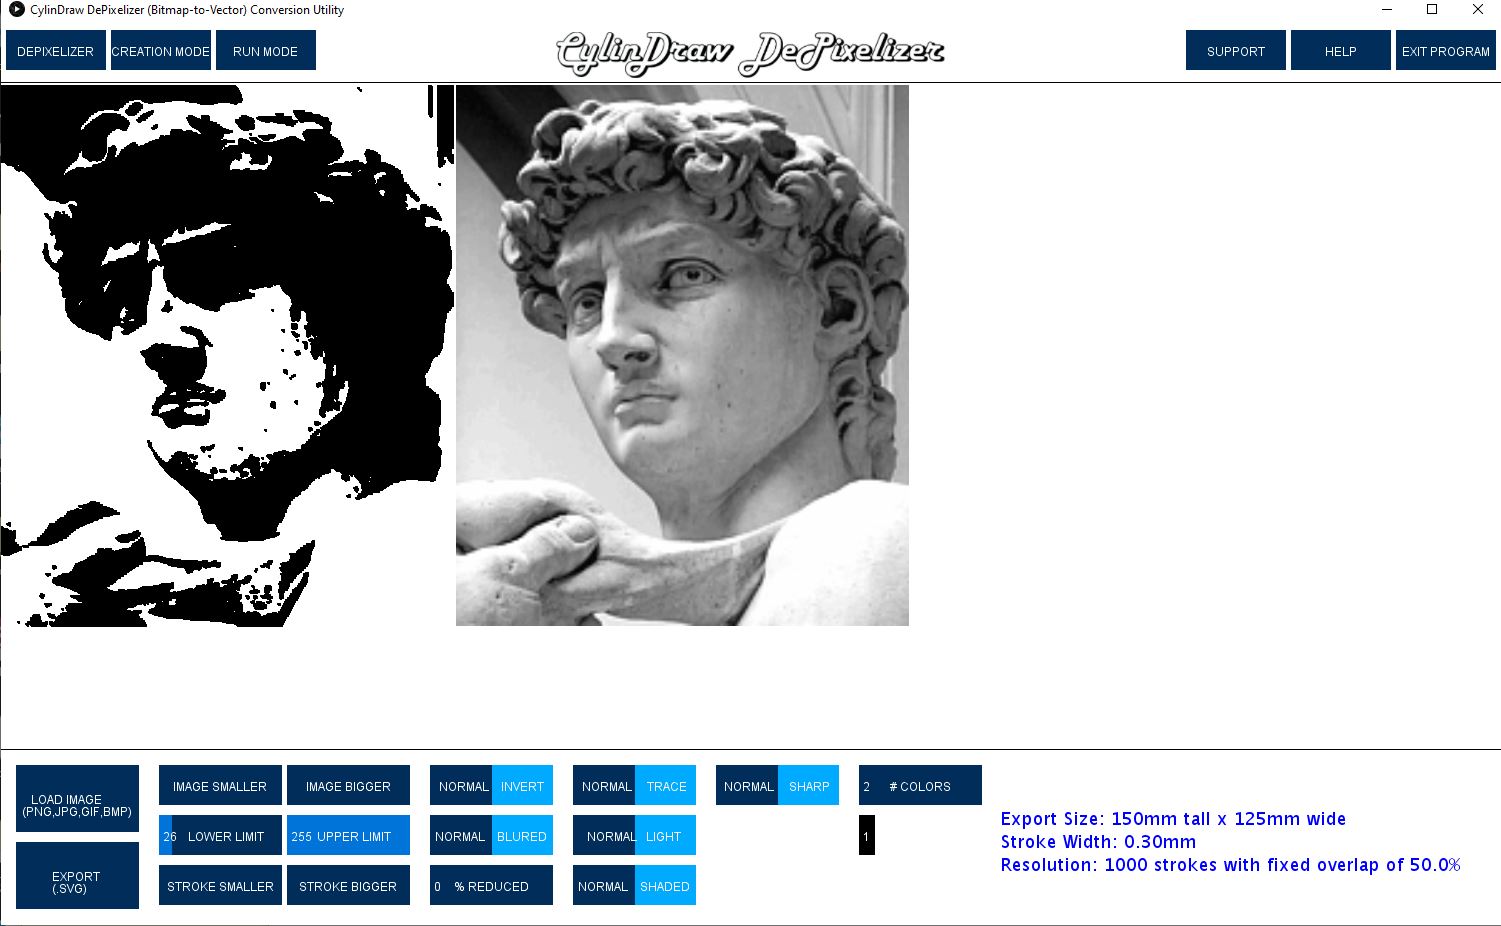
The simplest way to consolidate colors is a method called ‘thresholding’. You pick some threshold gray value, then convert every pixel in the image into completely black or white depending on which side of the threshold it falls on. Shown here as a screenshot in the CylinDraw DePixelizer program.
I adjusted the threshold value carefully, but you can see the image lost a lot of detail, especially around the eyes and hair.
We can attempt to get some of that detail back by applying a matrix filter, or what is essentially a strategically weighted average of pixels in a small area, applied over and over again.
The filter (or kernel) is the criteria for how the average is weighted and even small changes to it can have drastic effects on the result. (There are some great step by step images walking through this process at this link, but the core idea and math behind it is easier than first sounds.)
The effect of edge detection, sharpening, & embossing filters for example, is to emphasize the comparative difference between a given pixel and its nearest neighbors to make boundaries stand out. The examples below are still only black and white pixels but they show much more detail than before.
Another interesting color consolidation method is called stippling, or basically dithering on a larger scale. Just like the example shown earlier with red & blue squares appearing to blend together to make purple, except instead of dithering on a sub-pixel scale to produce a gray pixel, you dither together groups of pixels into consolidated larger dots to make the group appear gray in aggregate.
One way this technique is carried out is by performing a basic threshold on every pixel as before, except while doing so keep track of how much you’ve cumulatively rounded the pixels so far and apply that error as a bias going forward. So if you round a gray pixel toward black, it becomes more likely that the next gray pixel is rounded toward white. This keeps the overall rounding error low which preserves the intended effect of the shades of gray. Incredibly this image is nothing but black & white dots:
Those methods are widely used but there are examples of more esoteric methods and task specific tools that creative people have shared online for free. Here’s a couple I just made with ‘SquiggleCam’ & ‘Spiral Raster’ tools, both vary the amplitude of a wave based on the pixel darkness of a local matrix. I assume they did it that way to make the job faster by eliminating the need to lift the pen.
We can also do some neat stuff if we remove the black/white limitation & allow for drawing with a few more colors. Because we can easily program the plotter to sequentially draw each color on the same job.
The only real limitation to drawing in color is having enough uniquely colored pens and our ability to determine how to properly consolidate the pixels into a select few colors (a process called “color quantization”).
My software uses a Red/Green/Blue color model, which means that every possible color displayable on my screen can be quantified as some combination of those three colors. With a 3 category mix, the linear white to black scale we used for thresholding won’t work.
The question becomes, how do I compare the similarity of 2 colors on a 3 color scale? (i.e. Is that brown pixel more reddish green or bluish red or greenish blue?)
The trick is to use a tiny bit of trigonometry. We just pretend that Red, Green, & Blue constitute 3 perpendicular axes in space, then any color can be assigned a position in space based on its RGB components. From there any two colors can easily be compared using the distance formula, and voila we can figure out what parts of Obamas face are the most reddish green.
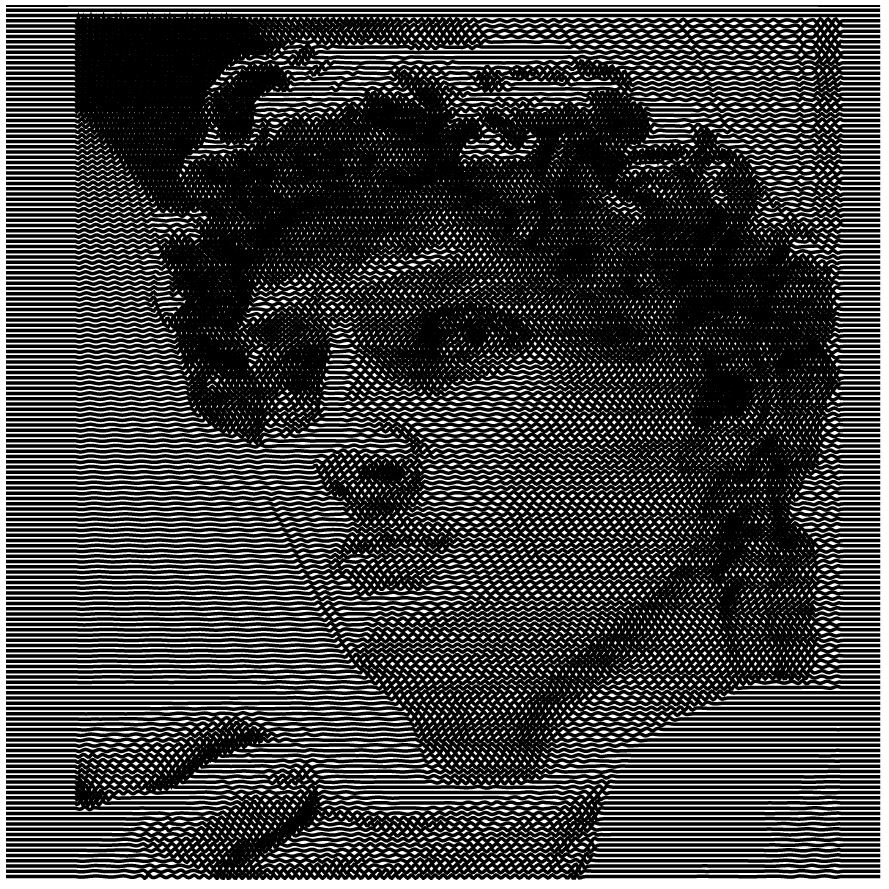
In this example I’ve used a sharpening filter & allowed 1 shade of gray on David. (This is what I ended up drawing on a cup). For an example that has more colors to begin with I tried to recreate the effect of the famous color reduced Obama campaign picture.
Up to this point I’ve shared some neat algorithms for conveying detail with a reduced color pallet, but to draw the image we still have to convert those pixels into mathematical paths the plotter can follow.
One of the most powerful & commonly used vectorization strategies is called contour tracing. A program checks every single pixel in the image and tries to logically connect the edge pixels into lines, then define & name the enclosed areas.
The rendering above was made using the default settings Inkscape. Edge tracing is a common capability since there are many ‘unique’ tools online that trace images for you, or so it would seem…
To the best of my knowledge the vast majority of edge tracing vectorization programs delegate the actual tracing task to one specific open source program, Potrace. Manually creating a good edge tracing algorithm yourself is quite difficult because of the nuance & complexity of keeping track of which lines should be combined to form enclosed spaces.
One problem with using the Potrace vectorizer for plotting is that the result does not take into account the size of your pen stroke.
A scalable vector graphic (SVG) by design can be scaled to any size and the paths will remain proportionally unchanged. So if I take a Potrace SVG and have my plotter draw it scaled onto paper at 2″ tall and then again at 20″ tall, the effect of the constant pen tip diameter will be significantly different.
All the perimeters on the smaller drawing will be thicker, possibly to the extent that they occlude the areas enclosed by them. I call this the narrow path problem. Its easily visualized by signing your name with a fine tip pencil, then tracing the signature with a thick sharpie.
Don’t put your personal signature on the internet folks.
For my DePixelizer software I came up with something original to solve this problem. Basically I rescale the raster image until one pen dot = one pixel so I can work at a 1:1 scale.
My program requires you to specify the desired physically drawn image size along with the pen stroke diameter. With that information I calculate the maximum number of pen diameters the image will be in width & height. This is the maximum resolution the pen is physically capable of achieving without overlapping strokes. (I squeeze a tiny bit more resolution out of the pen by allowing drawn strokes to overlap by 50%.)
What’s nice is that I don’t have to worry about defining edges & filled areas, I’m converting directly into readily usable dots that are located at the finest achievable positions.
Here you can see what a zoomed in screenshot of the corner of the CylinDraw logo. The first picture is a raw raster showing gray pixels everywhere around the edges. The second pic is cleaned with a threshold, and the third has a dithered edge trying to simulate those gray pixels. The dithering looks less desirable when vectorizing words, but the same effect looked much cooler when drawing David’s head earlier.
The tricky part is creating clean multicolor vectors.
Consolidating raster images into 3 or more non-white colors will produce errant dots that have to be filtered out. Thus the program was named after the primary challenge of improving it, “DePixelizer”.
Something more complex than a basic threshold filter is necessary. I use color quantization & sort by nearest match, but its really hard to correctly classify unsaturated gray pixels that have equal amounts of red, green, and blue content!
One method I use to reduce noise is to consolidate consecutive dots of the same color into lines, then remove any remaining lone dots because they were most likely noise and take longer to draw anyway. It works well for most scales but it starts breaking down as you continue to use larger markers & smaller output images.
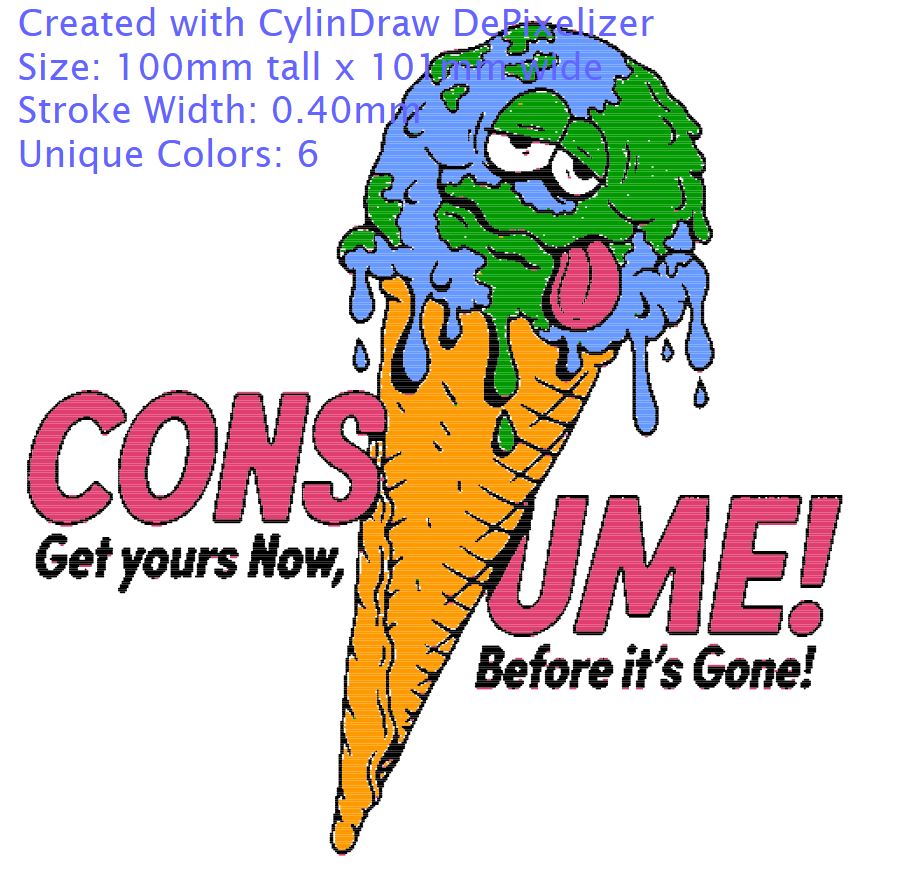
In the ‘earth ice cream’ example below you can see only a little bit of noise with a 0.4mm stroke on an 100mm tall image, imperceptible when drawn. But with an absurdly thick 2mm stroke its a mess because the pen resolution is only 100 strokes tall and the raster had to be blurred to resize it. This is approximately the best you can do with that pen at that size output.
In any case, the DePixelizer tool is great for creating derivative artwork and enabling people with a simple vision to carry it out quickly & easily.
Ironically, my favorite kind of plotter art is a type that beyond my current ability to produce.
This article has been about challenges of converting image types to make creative interpretations of existing images. But many folks create algorithms to generate vector images from scratch, called ‘generative art.’ There is some amazing new stuff out there pretty much daily if you follow the hashtag #plottertwitter.
That’s all for now, next time I’ll be sharing some cool algorithms involving path optimization.
…
Thirsty for more? Drink from the fire hose! Here are some excellent resources on these topics:
Performance notes from beginning. CylinDraw cannot and will never automatically switch out cups for you. It does manage the timing & order of pen swaps but it merely pauses the job & beeps prompting you to switch the pen. For the task of engraving, cups-per-hour is a more relevant metric since the output is indistinguishable from the alternative tech; the full process throughput is probably half the speed of a good rotary laser engraver.
Good news everyone, we just posted the CylinDraw Kits on our Etsy web store! We are offering an introductory special including: Free Shipping, 10% off all orders, and we are including a bonus stainless steel tumbler along with kits while supplies last. Special ends July 6th.
*First I want to point out that this work is not a ‘Kickstarter’ type project. We believe in the future of CylinDraw and have self funded the initial round of inventory. So you don’t have to worry about indefinitely long delivery schedules, and we can focus our efforts only on the most value-added aspects of the work.
*Developing & hardening the machine design & software was only the beginning. We’ve been working on expanding our workshop, honing our assembly processes, and figuring out packaging & shipping logistics. From experience we’ve learned that intentionally designing your internal processes pays back major dividends. (Lessons learned on that front to come!)
*2021 has been showing some of its ugly side with supply chain delays abound…the ‘great chip shortage‘ has affected our ability to secure multiple parts. We ordered everything quite some time ago and (almost comically) the estimated delivery dates kept getting push back! Well have to keep that in mind as we go forward. As it is, we finally have 100% parts in house!
*We are experiencing an extreme heatwave here in Portland Oregon. With air temperatures over 110F, it is personally too much to withstand being outdoors for too long. Many buildings around here do not have air conditioning, so we feel quite lucky that we do have it. Still, by late afternoon the AC can’t keep up since the mass of the whole building has been heated and indoor temps rise into the 80’s. We had to pause all 3d printing this week so as not to make matters worse.
*We’ve developed and honed a new tool to help with your vectorization workflow! Its an Inscape based fully automated PNG to SVG bot. Wicked cool, looking forward to sharing the details on that soon, but here’s the link for now: https://cylindraw.com/autovector/
*Questions about ordering can be directed to CylinDraw@Gmail.com
*Development ideas & technical questions are best asked in a public forum so that others can learn from the experience too! I setup a CylinDraw specific Discord server here.
That’s all for today, next time we’ll be sharing an article about the joy of vectorization. (The process really is quite interesting!)
..
Edit to note: If you do have your own 3d printer, getting together all the random non-printed parts for the CylinDraw without going through us is cost prohibitive & lead-time prohibitive to do on your own due to the global shipping delays. The very best way to finish the machine is to pick up our hardware kit too because we buy everything in bulk, check it, sort it, and we can offer all & only what you need at a good price! Plus, shopping with us supports independent creators!
(This article was originally posted on my blog at EngineerDog.com.)
When I was younger every Christmas at least one person in my family would inevitably receive the gift of a new flashlight. The trend never failed and became a running inside joke.
“I don’t know what to get anyone, you’re all about to get flashlights.”
Part of the punchline was that doing so would have been normal & acceptable, since the receiver was always genuinely happy to get one. And why shouldn’t they be, a flashlight has broad appeal. It’s an all-ages, timeless, semi-durable good that’s highly utilitarian and has a wide variety of forms & sizes possible that allow it to retain the necessary degree of novelty a gift needs to be fun.
Its been a while since the family has gotten together but I’ve got next year covered since I discovered something else that meets all the criteria outlined above. Custom made tumblers are ‘the new flashlight’ gift.
It turns out that many others out there have discovered this too. The trend is obvious when you look. People are making some highly creative cups online and they are using a wide variety of tools to do it.
I’ve seen tools as simple as a continuous motor driven cup rotator for applying glitter & epoxy coatings. More advanced tools like vinyl cutters allow people to create custom sticker decals. The most advanced makers utilize laser engravers with rotary jigs and even automated cup silkscreen machines.
All of these makers are serving a large, growing, and ultimately insatiable market because when will people ever not enjoy cool cups? (Or flashlights for that matter)
Over the last year, I have been developing a semi-secret project. I am very excited to share this, its been the focal point of much of my free time for a while.
I created a brand new type of tool that I believe can make a significant contribution toward serving the creators in the cup customization space. Especially those looking to find a competitive edge and bring something new to this market.
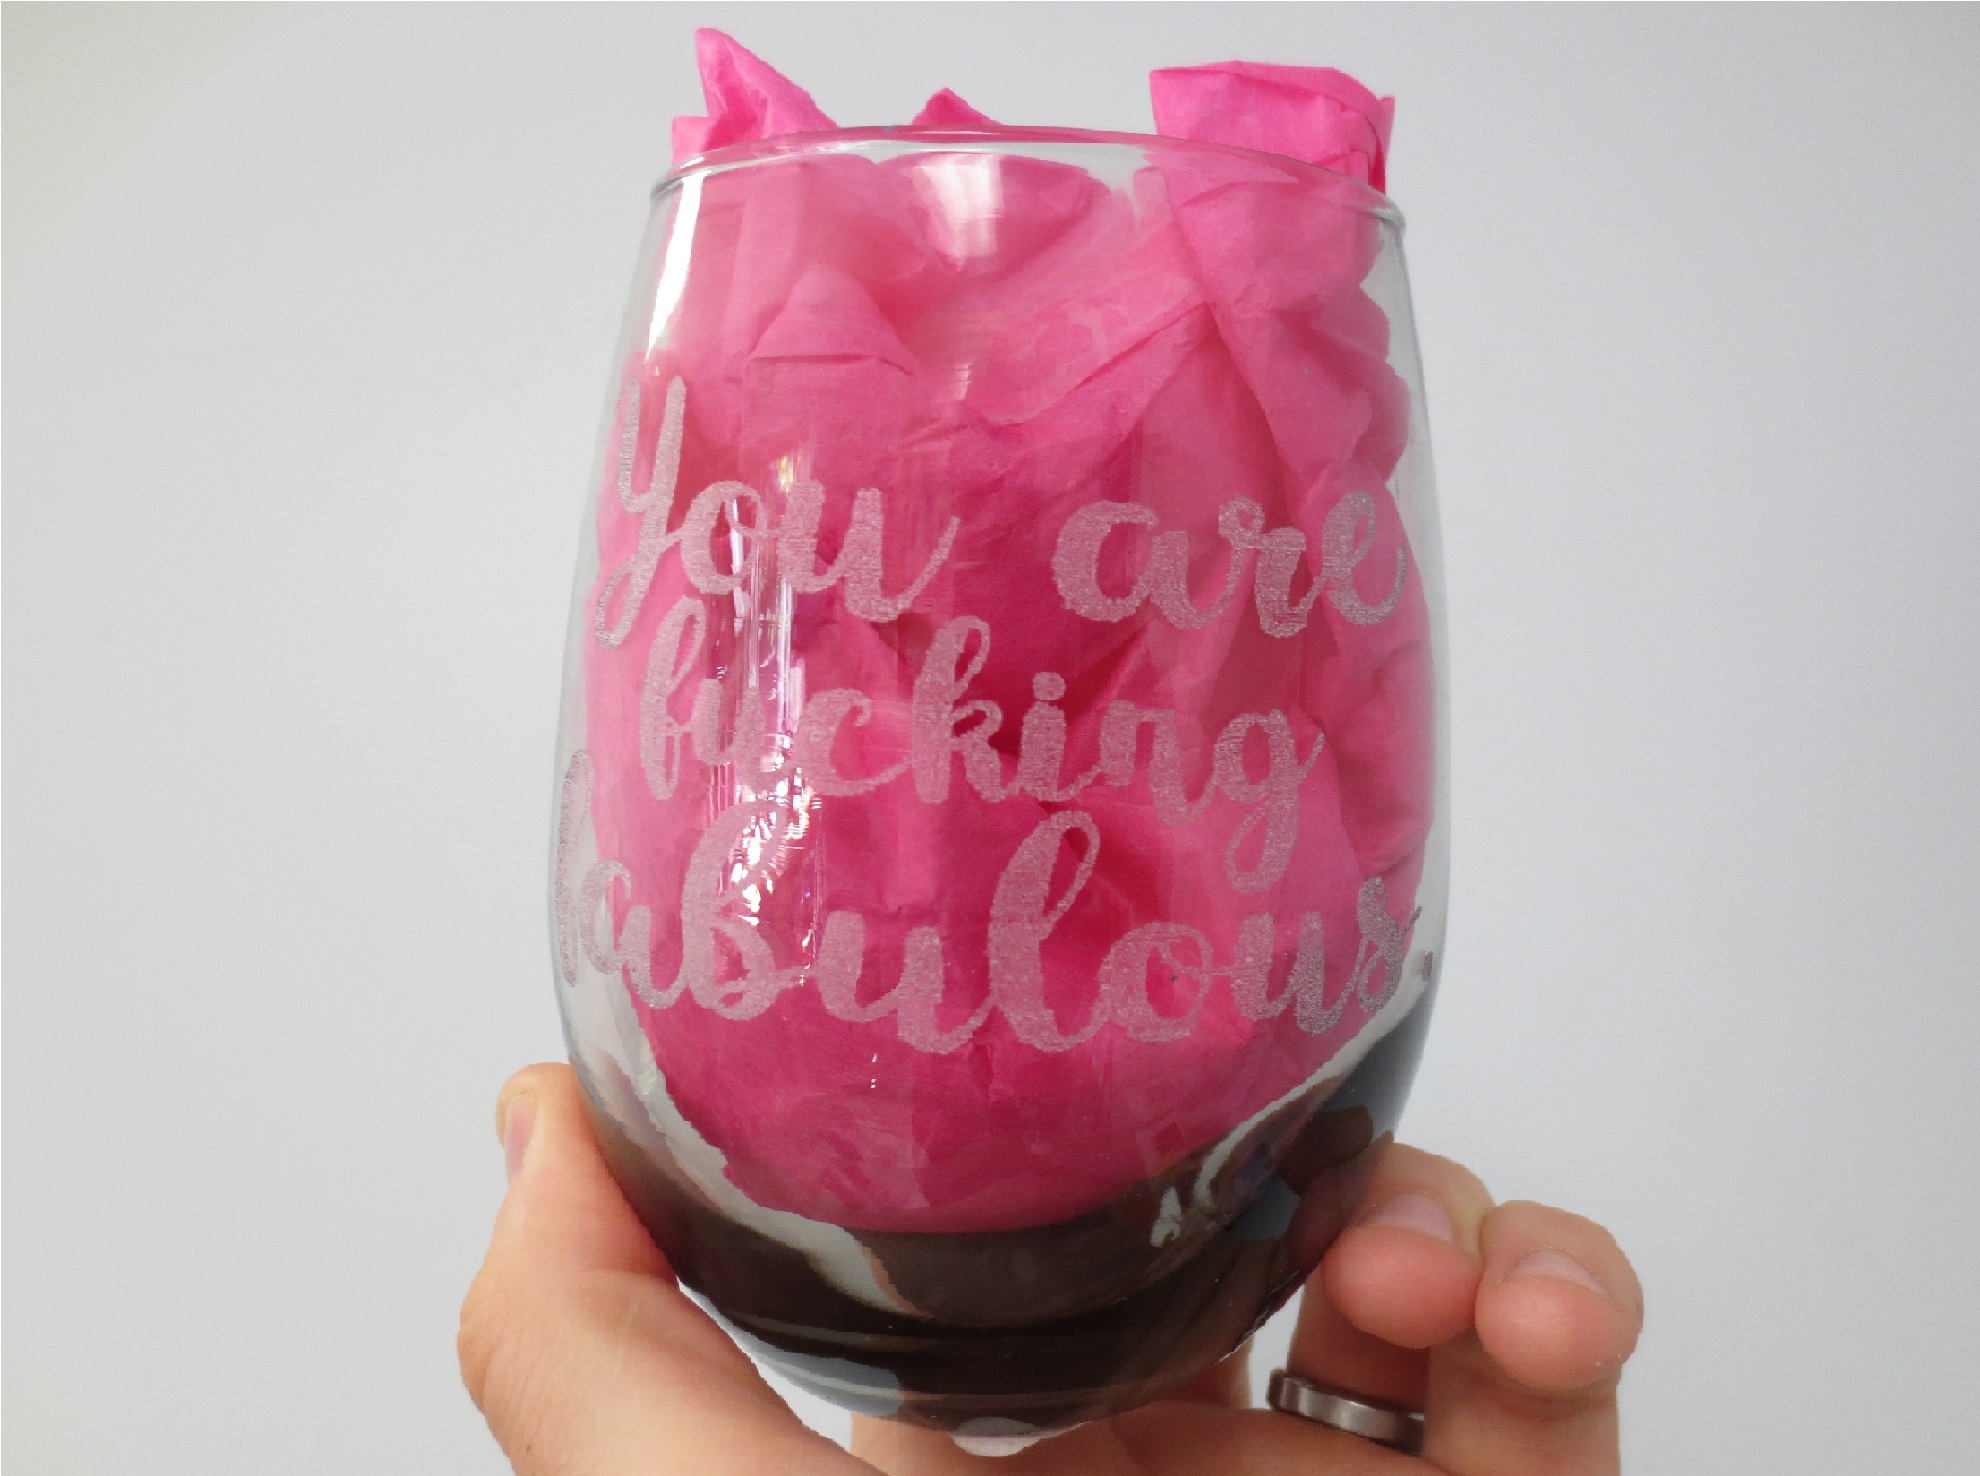
This is the CylinDraw, it lets you easily create incredible art on any kind of cup!
CylinDraw essentially does 2 things: It can engrave & it can paint. And it is highly adjustable so it can do those 2 things on any kind of cup. (tumblers, wine glasses, mason jars, shot glasses, mugs with handles, or any cylindrical object tapered or not under 3” diameter & 11” tall).
As a painting tool, we have experimented and perfected techniques for drawing on multiple types of materials and coating the end result to make it dishwasher safe. (Though there is a wide world of markers and coatings out there to choose from to continue experimenting with!)
As an engraver, CylinDraw is an order of magnitude less expensive in terms of upfront/operating/& maintenance costs when compared to a rotary laser engraver, while offering better ease of use and equivalent drawing resolution. (CylinDraw operates at 0.2mm wide stroke, lasers are 0.1-0.5mm.) Engraving is also a safer cleaner process than laser etching since fumes and fire are not a factor. Lasers must be vented to the outside because of chemical byproducts (smoke), while mechanical engravers only create physical byproducts (microparticles) which can be contained with a shop vac.
But of equal importance to what it does, is how it does it.
Cool hardware is still a useless brick without software, and if the software sucks then its an irritating brick. But get both things right and using the tool becomes such an effective process that you can start taking it for granted. That’s when you know it has improved your life. That was the design intent. Every aspect of this tool is designed to make the user experience painless, because I think computers should just work so you can focus on the art!
CylinDraw software is free* and all-inclusive. It can convert any bitmap image like a photo or screenshot into a vector graphic (SVG) and then into a drawing-in-progress in minutes. Most drawings are doable in under an hour.
The system automatically makes assumptions on your behalf to streamline the process. A few examples:
Multicolor jobs self sort the colors by brightness so you don’t smear light colors with dark ones.
Drawing paths are optimized using a honed greedy algorithm.
It automatically updates the feed & speed (steps-per-mm) to account for varying cup diameter.
Automatic connection to the tool when the USB cable is plugged in. A happy beep tells you all is well.
Separate user interfaces for separate functions so that all the information on screen is relevant, and the only controls you have are the ones you need.
No internet-of-things planned obsolescence security nightmare nonsense. CylinDraw operates entirely without internet access.
Custom ‘JOB’ files (machine readable g-code files) use an .svg extension so they can be viewed as thumbnails or in a browser, or they can be parsed with a viewer program that is part of the package.
..
Overall I think CylinDraw represents a high value proposition for what it does and I am excited to see what creative works people will come up with. I am preparing to offer kits in my store that will appeal to do-it-yourselfers as well as folks who prefer a turnkey experience.
Kit Option 1: You 3D Print + You Assemble it: You get the 3d printable files & make them yourself. We send you all the tools, electronics & mechanical hardware. You build it using instructions online.
Kit Option 2: We 3D Print + You Assemble it: We send you all the 3d printed parts, tools, electronics & mechanical hardware. You build it using instructions online.
Kit Option 3: We 3D Print + We Assemble it: CylinDraw comes to you tested & ready to use.
*The software is license locked but a license is free for anyone who buys a kit from us.
If you want to be the first to hear when kits become available then visit the project homepage and enter your email address. Doing so comes with benefits! To get this project going (& to celebrate your great taste in blog reading material) I am offering early followers an introductory special for my first batch of kits, valid in my store while supplies last.